
Intro to React State
Learning Objectives
- Learn about state
- Learn how to declare state in a React component
- Learn how to iterate over some data and render it
Students will be able to:
- Understanding Component Driven Development
- Understanding Declarative Programming
- Understand the Virtual DOM and it's purpose
- Understand React Dev Tools
- Build a Simple Todo List Application using Component Driven Development, Declarative Programming, The Virtual DOM, React Dev Tools
State
State is the particular view of a React component based on it's data.
We can imagine we have a component that has our shopping cart
At first, our cart is empty. Our state would likely be an empty array .
Then we add an item into our cart. We'd push an object like this one into our cart:
{
 itemName: 'Jar of Speculoos',
 description: 'Imagine butter cookies dissolved in butter, made into cookie butter and stored in a jar. Stop imagining and now buy this!',
 price: 6.99
}
Now our view of our shopping cart will change, based on the data or the state of the shopping cart.
Beginning with the End in Mind
React, Components and The Virtual DOM


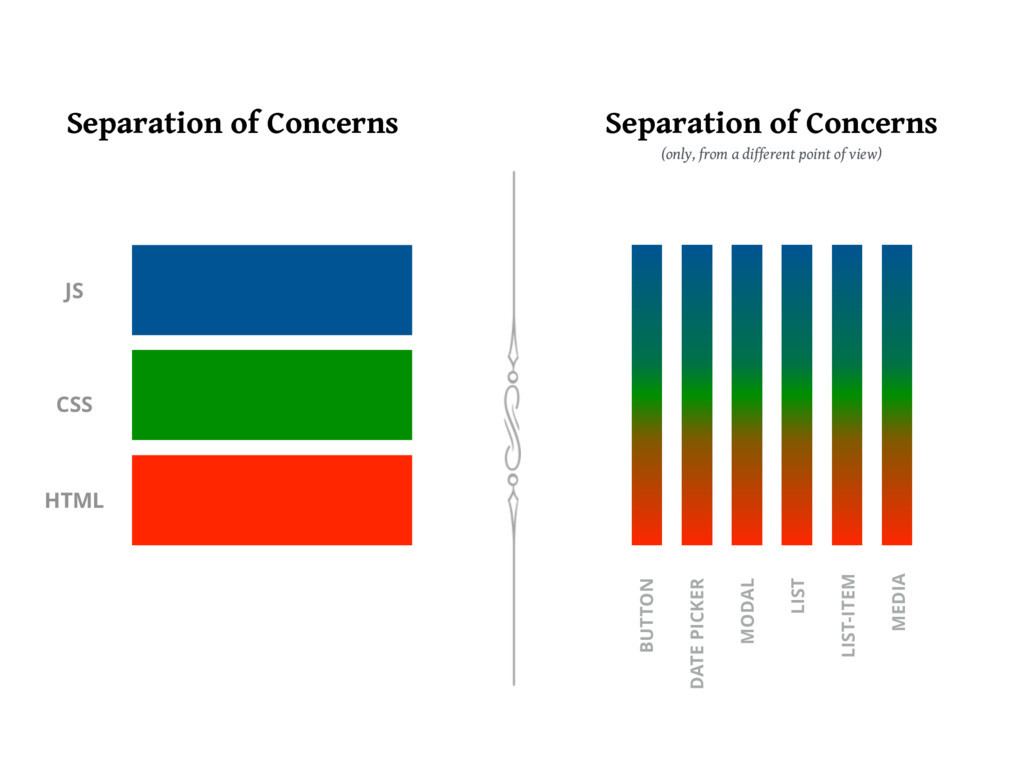
Seperation of Concerns
Separation of concerns in web development is the practice of breaking down a web application into distinct parts that each handles a separate concern, such as the user interface, business logic, and data access. This helps to improve maintainability, scalability, and reusability of the application.
Traditionally Frontend is seperated into
HTML: Structure
CSS: Presentation
JS: Functionality
A different way of Seperating Concerns with Component Driven Development
Component Driven Development
Click For More
Component Driven Development (CDD) is an approach to web development that makes use of reusable components to create a user interface. It is based on the React JavaScript library and is used to create interactive websites, mobile apps, and other user interfaces. React is a JavaScript library created by Facebook with a focus on performance and scalability.
CDD makes use of reusable components, or “widgets”, to create a user interface.
Each component is responsible for rendering a specific part of the user interface, and components can be composed together to create a complete user interface.
React components are written using JavaScript and the React library provides a set of tools to help developers create and manage components.
CDD also makes use of a declarative programming style, which makes it easier to write code that is easier to maintain and debug.
In addition, React's component-driven architecture encourages developers to write modular code, which makes it easier to reuse and update components.
Finally, React supports server-side rendering, which allows developers to create faster and more responsive user interfaces.
Component Driven Development is a powerful and efficient approach to web development that is based on the React JavaScript library. It makes use of reusable components and a declarative programming style to create user interfaces that are easy to maintain and debug. Additionally, React supports server-side rendering, which allows developers to create faster and more responsive user interfaces.
Declarative Programming
Click For More
Declarative programming is a programming style in React that focuses on describing the logic of a program, rather than describing the exact steps the program should take to reach a certain outcome. In React, this is achieved by using components, properties, and state.
Components are the basic building blocks of React, and are used to represent pieces of user interface. They are composed of HTML, JavaScript, and other languages, and can be reused in different parts of the application. Properties are used to provide data to components, while state is used to store data.
Declarative programming in React allows developers to focus on the logic of the program, rather than the implementation details. This makes it easier to create responsive, reusable, and testable components. It also allows for rapid development, since changes can be made without needing to rewrite the entire application.
Declarative programming in React is an efficient and powerful programming style that allows developers to focus on the logic of their program. It makes applications more responsive and easier to maintain, as well as allowing for faster development.
The Virtual DOM
Click For More
The Virtual DOM is a core concept of React, a JavaScript library used to create user interfaces. The Virtual DOM is a JavaScript representation of the actual DOM, or Document Object Model, which is the tree structure of HTML elements in a web page. The Virtual DOM allows React to make changes to the DOM without having to reload the page or redraw the page.
The Virtual DOM works by creating a virtual representation of the current DOM and comparing it to the desired state of the DOM. When a change is made, React runs a diffing algorithm which looks for differences between the virtual DOM and the actual DOM. The diffing algorithm then determines which parts of the DOM need to be changed and updates only those parts, instead of having to redraw the entire page. This makes changes to the DOM faster and more efficient.
React's use of the virtual DOM also allows developers to write more efficient code. Instead of having to write code to manipulate the DOM directly, developers can use React's declarative API to describe the desired state of the DOM, and React will handle the rest. This makes it easier for developers to create complex user interfaces and makes their code less prone to errors.
The Virtual DOM is a core concept of React that allows it to make changes to the DOM without having to reload the page or redraw the page. It works by creating a virtual representation of the current DOM and comparing it to the desired state of the DOM, and then updating only the parts that need to be changed. This makes it faster and more efficient to make changes to the DOM, as well as easier for developers to create complex user interfaces.
React Developer Tools
Click for More
React Developer Tools is a browser extension for Chrome and Firefox that allows users to inspect and debug React components in their applications. The tool allows developers to see the components, props, state and hierarchy of their React app in an interactive way. It also provides helpful features such as the ability to find components by name, view their source code, and edit them in the browser.
To install React Developer Tools, first open the Chrome Web Store, then search for “React Developer Tools”. The extension should appear in the search results. Click “Add to Chrome”, then confirm the installation. Once the installation is complete, the React Developer Tools icon should appear in the Chrome toolbar. We will be using the Components Tab in the React Dev Tools.
The React Developer Tools extension is an invaluable tool for React developers. It allows developers to easily inspect and debug their components, as well as view their props, state and hierarchy. With these features, React developers are able to more quickly identify and fix problems in their apps.
For a new React Learner looking to develop React applications, the React Developer Tools extension is a must-have. With its intuitive interface and helpful features, the extension will provide a wealth of information that can be used to debug and optimize applications. Furthermore, installation is quick and easy, making it a great addition to any React developer’s workflow.
Thinking In React
Click For More
Thinking in React is a concept developed by Facebook to help web developers build user interfaces (UI) more efficiently. It is a component-based approach that focuses on breaking down UI elements into small, reusable components. This allows developers to break down complex tasks into individual, simple parts that can be reused as needed. The main idea behind Thinking in React is to think of the UI as a set of components, or small pieces, that can be moved around, modified, and reused.
Thinking in React requires developers to break down an application into smaller components, each of which has its own state. State is data that is stored within a component, such as a user’s name or what items are in their shopping cart. By breaking down an app into smaller components, developers can more easily manage application state and make sure that updates only affect the component that needs updating.
The Thinking in React approach also encourages developers to use one-way data flow. This means that data flows from parent components to child components, rather than from child components to parent components. This helps keep components independent and makes it easier to debug and maintain an application.
Thinking in React is a great tool for building efficient, reusable user interfaces. It encourages developers to break down complex applications into small, reusable components and to use one-way data flow to keep components independent. This helps developers create robust applications quickly and easily.
The useState Hook
The useState hook allows us to generate variables that are special, as updating them would trigger your component and its children to update.
First step is always importing the useState hook.
import { useState } from "react"Inside the body of your component function you can then initiate a state variable. The name convention is "state" for the variable and "setState" for the function that updates the states value.
If I wanted to create state for a counter it would look like this.
// initiate counter at 0, setCounter let's me update counter
const [counter, setCounter] = useState(0)
So a simple counter component would look like this...
import { useState } from "react"

export default function Counter(props) {
  // Declare the state
  const [counter, setCounter] = useState(0)

  // Function to add one to the state
  const addOne = () => {
    // sets counter to its current value + 1
    setCounter(counter + 1)
  }

  // The h1 display the counter and button runs addOne function
  return (
    <div>
      <h1>{counter}</h1>
      <button onClick={addOne}>Click Me to Add One</button>
    </div>
  )
}
That's as simple as it gets. What happens when the button is clicked.
- setCounter is passed the current value + 1
- React then compares this new value to the old value of counter
- If they are the same, React does nothing (beware of references as values when it comes to objects and arrays, make sure you understand pass by value vs pass by reference remeber the
arthurshouse taraleeshouse example from unit 1) - If they are different then React updates its VirtualDOM based on a re-render of the component and its children
- It then compares the virtualDOM to the real browser DOM and only updates the places in which they differ.
The above process is why variables that are "State" are reactive, meaning the DOM will updates when the value updates. All other variables are not reactive and will not trigger updates when changed.
NOTE: If the state is an object or array, make sure you pass a new array or object and not just modify the old one. Objects and Arrays are reference types, so if you pass the old array with modified values the references will still be equal so there will be no update to the DOM.
Example...
Don't do this
// modify the existing state
state[0] = 6
// then setState as the existing state, triggering NO update
setState(state)
also don't do this
// these two variables are both pointing to the same position in memory
const updatedState = state
// no update is triggered
setState(updatedState)
Do this
// create a unique copy of the array
const updatedState = [...state]
// modify the new array
updatedState[0] = 6
// set the State to the updatedArray, DOM will update
setState(updatedState)
The useEffect Hook
Here is our counter component from earlier with a console.log and second piece of state.
import { useState } from "react"

export default function Counter(props) {
  // Declare the state
  const [counter, setCounter] = useState(0)
  // second piece of state
  const [evenCounter, setEvenCounter] = useState(0)

  console.log("I'm just a random log")

  // Function to add one to the state
  const addOne = () => {
    // if counter is even before the update, update evenCounter
    if (counter % 2 === 0) {
      setEvenCounter(evenCounter + 1)
    }
    // sets counter to its current value + 1
    setCounter(counter + 1)
  }

  // The h1 display the counter and button runs addOne function
  return (
    <div>
      <h1>{counter}</h1>
      <h1>{evenCounter}</h1>
      <button onClick={addOne}>Click Me to Add One</button>
    </div>
  )
}
So right now this component displays both counter in its JSX
- when we click the button counter will always go up by 1
- if counter is even before it is increased, evenCounter will go
Any code in the function body will run again on every render of the component. The component will render with every change of state. So in this case if we keep clicking the button that console.log will run again and again.
What if we only want it to run when evenCounter changes.
This is where the useEffect hook comes into play. This hook is a function that takes two arguments:
- A function that will be run immediately when the component loads and anytime any value in the second argument changes
- An array of values, when they change the function will run again. Usually an empty array if you never want the function to run again.
import { useState, useEffect } from "react"

export default function Counter(props) {
  // Declare the state
  const [counter, setCounter] = useState(0)
  // second piece of state
  const [evenCounter, setEvenCounter] = useState(0)

  //making sure console.log only runs on certain renders
  useEffect(() => {
    console.log("I'm just a random log")
  }, [evenCounter])

  // Function to add one to the state
  const addOne = () => {
    // if counter is even before the update, update evenCounter
    if (counter % 2 === 0) {
      setEvenCounter(evenCounter + 1)
    }
    // sets counter to its current value + 1
    setCounter(counter + 1)
  }

  // The h1 display the counter and button runs addOne function
  return (
    <div>
      <h1>{counter}</h1>
      <h1>{evenCounter}</h1>
      <button onClick={addOne}>Click Me to Add One</button>
    </div>
  )
}
So notice the useEffect receives a function that executes our log, and we also gave it an array with evenCounter in it. This means...
- The function will run once when the component is first loaded
- The function will run again only when evenCounter changes
useEffect is more regularly used for API calls. Usually you'll call the API, get the data then update state inside a useEffect to prevent an infinite loop from occurring.
const getSomethingFromAPI = async(url) => {
 try {
  const response = await fetch(url)
  const data = await response.json()
  setState(data)
 }catch(e){
    console.error(e)
 }
}
useEffect(() => {
  getSomethingFromAPI('api url')
}, [])
Also if the function given to useEffect returns a function, the returned function will be run when the component is removed from the DOM useful for removing event listeners that may be left behind (not something that should come up often)
Problem Solving
ALLLLLLL MY STUDENTS ALWAYS end up being asked at some point in the interview process how to create a Todo List with Basic CRUD capability.
Creating New Todo Items
Reading/Seeing Todos
Updating Todos that have been created
Deleting Todos off the Page
This excercise provides step-by-step instructions for creating a simple React Todo List using React Hooks. It covers setting up the initial project, creating the React components and styling them, and using React Hooks to store and manipulate data. By the end, you will have a fully functional React Todo List.
- Set up your project: First, create a new React project using the create-react-app command. Delete src folder, and then re-create it. Add Back in index.js, App.js, styles.css
- Create a Todo component: Next, create a Todo component that will render a single todo item. This component should accept a todo object as a prop and display the todo’s text and a checkbox to mark it as complete.
- Create a TodoList component: Then, create a TodoList component that will render a list of todo items. This component should accept an array of todo objects as a prop, and loop through the array to render a Todo component for each item.
- Use React Hooks: Next, use React Hooks to store and manipulate the data with UseState
- Handle user interactions: Then, add event handlers to handle user interactions. For example, you can add an onChange handler to the checkbox to mark a todo as complete.
- Add new todos: Add an input to the TodoList component so users can add new todos. This input should update the state when the user types enter.
- Filter todos: Add a filter option to the TodoList component so users can filter todos by completed or incompleted.
- Add persistence: To persist the data, you can use local storage. Add a function to save and retrieve the todos from local storage.
- Add Delete Functionality to the Todo List
- Add styling: Now, add some basic styling to the components.
- Test and debug: Finally, test and debug the app to make sure everything is working correctly.
By following these steps, we will have a fully functional React Todo List.
In each file lets brainstorm it's purpose
index.js
- What is the purpose of this file
- What code should be contained here?
App.js
- What is the purpose of this file?
- What code should be contained here?
styles.css
- What is the purpose of this file?
- What code should be contained here?
Todo.js
- What is the purpose of this file?
- What code should be contained here?
TodoList.js
- What is the purpose of this file?
- What code should be contained here?
Diagram
Now That We Have A Game Plan
- Lets do Step 1
- Set up your project: First, create a new React project using the create-react-app command. Delete src folder, and then re-create it. Add Back in index.js, App.js, styles.css, components/Todo.js, components/TodoList.js
Index.js
import { StrictMode } from "react"
import { createRoot } from "react-dom/client"

import App from "./App"

const rootElement = document.getElementById("root")
const root = createRoot(rootElement)

root.render(
  <StrictMode>
    <h1>Basic Todo List Evelyn</h1>
    <App />
  </StrictMode>
)
components/Todo.js
export default function Todo(props){
    return(<h1>Todo</h1>)
}
components/TodoList.js
export default function TodList(props){
    return(<h1>Todo List</h1>)
}
App.js
import "./styles.css";
import { useState, useEffect } from "react"
import TodoList from "./components/TodoList"

export default function App() {
  return (
    <div className="App">
      <TodoList/>
    </div>
  )
}
Next Lets Create the Todo and TodoList Component
- Create a Todo component: Next, create a Todo component that will render a single todo item. This component should accept a todo object as a prop and display the todo’s text and a checkbox to mark it as complete.
- Create a TodoList component: Then, create a TodoList component that will render a list of todo items. This component should accept an array of todo objects as a prop, and loop through the array to render a Todo component for each item.
- Use React Hooks: Next, use React Hooks to store and manipulate the data.
- Handle user interactions: Then, add event handlers to handle user interactions. For example, you can add an onChange handler to the checkbox to mark a todo as complete.
- Add new todos: Add an input to the TodoList component so users can add new todos. This input should update the state when the user types enter.
- Filter todos: Add a filter option to the TodoList component so users can filter todos by completed or incompleted.
- Add Delete Functionality to Todo
App.js
import "./styles.css"
import { useState, useEffect } from "react"
import TodoList from "./components/TodoList"

export default function App() {
  const [todos, setTodos] = useState([])

  const addTodo = (e) => {
    const newTodo = { text: e.target.value, id: Date.now(), completed: false }
    setTodos([newTodo, ...todos])
    e.target.value = ""
  }

  const completeTodo = (id, e) => {
    const todosCopy = [...todos]
    const indexOfTodo = todosCopy.findIndex((i) => i.id === id)
    todosCopy[indexOfTodo].completed = !todosCopy[indexOfTodo].completed
    setTodos([...todosCopy])
  }

  const editTodoText = (id, e) => {
    const todosCopy = [...todos]
    const indexOfTodo = todosCopy.findIndex((i) => i.id === id)
    todosCopy[indexOfTodo].text = e.target.value
    setTodos([...todosCopy])
    e.target.value = ""
  }

  const deleteTodo = (id) => {
    const todosCopy = [...todos]
    const indexOfTodo = todosCopy.findIndex((i) => i.id === id)
    todosCopy.splice(indexOfTodo, 1)
    setTodos([...todosCopy])
  };

  return (
    <div className="App">
      <TodoList
        todos={todos}
        addTodo={addTodo}
        completeTodo={completeTodo}
        editTodoText={editTodoText}
        deleteTodo={deleteTodo}
      />
    </div>
  );
}
Todo.js
import { useState } from "react"

export default function Todo({ todo, completeTodo, editTodoText, deleteTodo }) {
  const [showInput, setShowInput] = useState(false)
  return (
    <li>
      <div className="left">
        <h2
          onClick={(e) => {
            setShowInput(!showInput)
          }}
        >
          {todo.text}
        </h2>
        <input
          style={{ display: showInput ? "block" : "none" }}
          type="text"
          onKeyDown={(e) => {
            if (e.key === "Enter") {
              editTodoText(todo.id, e)
              setShowInput(false)
            }
          }}
        />
      </div>
      <label className="middle">
        Complete
        <input
          type="checkbox"
          checked={todo.completed}
          onChange={(e) => {
            completeTodo(todo.id, e)
          }}
        />
      </label>
      <button
        checked={todo.completed}
        onClick={(e) => {
          deleteTodo(todo.id)
        }}
      >
        Delete Todo
      </button>
    </li>
  )
}
TodoList.js
import Todo from "./Todo"

export default function TodoList({
  todos,
  addTodo,
  completeTodo,
  editTodoText,
  deleteTodo
}) {
  return (
    <>
      <h1>Create Todo</h1>
      <input
        type="text"
        onKeyDown={(e) => {
          e.key === "Enter" && addTodo(e)
        }}
      />
      {todos.length ? (
        <>
          <h1>Todo Items</h1>
          <ul className="todolist">
            {todos
              .filter((i) => !i.completed)
              .map((todo) => {
                return (
                  <Todo
                    key={todo.id}
                    todo={todo}
                    completeTodo={completeTodo}
                    editTodoText={editTodoText}
                    deleteTodo={deleteTodo}
                  />
                )
              })}
          </ul>
          <h1>Completed Items </h1>
          <ul className="todolist">
            {todos
              .filter((i) => i.completed)
              .map((todo) => {
                return (
                  <Todo
                    key={todo.id}
                    todo={todo}
                    completeTodo={completeTodo}
                    editTodoText={editTodoText}
                    deleteTodo={deleteTodo}
                  />
                )
              })}
          </ul>
        </>
      ) : (
        <h1>No Todos Added Yet</h1>
      )}
    </>
  )
}
Add Persistence
Add A UseEffect
Like we mentioned at the beginning of class the useEffect hook in React is a built-in hook that allows developers to execute code after a component renders. It is triggered after every render, including the first render. It is used to perform side effects such as data fetching, manually changing the DOM, and subscribing/unsubscribing from external events. The useEffect hook takes a function as an argument and is triggered after the component renders. This function should contain all of the code that needs to be executed after the component renders. The useEffect hook is a powerful tool for managing side effects in React components.
  useEffect(() => {
    const savedTodos = localStorage.getItem("todos");
    if (savedTodos && savedTodos !== "undefined" && savedTodos !== "null") {
      setTodos(JSON.parse(savedTodos));
    }
  }, []);
We are using the useEffect here to take todos that are stored in the localStorage and automatically set our state to them.
But in order for this code to actually ever fetch anything from localStorage we need to set the localStorage everytime we update the state
localStorage.setItem("todos", JSON.stringify(Place Todos Here))Local Storage to persist simple data
LocalStorage can be used with React to store and retrieve data in the browser after the user does a reload of the browser.
To set a value in the browser’s local storage, use the setItem() method. For example, to store a value called ‘name’, use the following code:
localStorage.setItem('name', 'John Doe');To retrieve a value from the browser’s local storage, use the getItem() method. For example, to retrieve the value stored with the key ‘name’, use the following code:
let name = localStorage.getItem('name');To remove a value from the browser’s local storage, use the removeItem() method. For example, to remove the value stored with the key ‘name’, use the following code:
localStorage.removeItem('name');localStorage saves all data as a string so we also must use the JSON.stringify to stringify things like objects and arrays before we store it in localStorage
Then when we want to retrieve it we must use JSON.parse to turn it back into an object or array.
import "./styles.css"
import { useState, useEffect } from "react"
import TodoList from "./components/TodoList"

export default function App() {
  const [todos, setTodos] = useState([])

  useEffect(() => {
    const savedTodos = localStorage.getItem("todos")
    if (savedTodos && savedTodos !== "undefined" && savedTodos !== "null") {
      setTodos(JSON.parse(savedTodos))
    }
  }, [])

  const addTodo = (e) => {
    const newTodo = { text: e.target.value, id: Date.now(), completed: false }
    localStorage.setItem("todos", JSON.stringify([newTodo, ...todos]))
    setTodos([newTodo, ...todos])
    e.target.value = ""
  }

  const completeTodo = (id, e) => {
    const todosCopy = [...todos]
    const indexOfTodo = todosCopy.findIndex((i) => i.id === id)
    todosCopy[indexOfTodo].completed = !todosCopy[indexOfTodo].completed
    localStorage.setItem("todos", JSON.stringify([...todosCopy]))
    setTodos([...todosCopy])
  }

  const editTodoText = (id, e) => {
    const todosCopy = [...todos]
    const indexOfTodo = todosCopy.findIndex((i) => i.id === id)
    todosCopy[indexOfTodo].text = e.target.value
    localStorage.setItem("todos", JSON.stringify([...todosCopy]))
    setTodos([...todosCopy])
    e.target.value = ""
  }

  const deleteTodo = (id) => {
    const todosCopy = [...todos]
    const indexOfTodo = todosCopy.findIndex((i) => i.id === id)
    todosCopy.splice(indexOfTodo, 1)
    localStorage.setItem(
      "todos",
      JSON.stringify([...todosCopy])
    )
    setTodos([...todosCopy])
  }

  return (
    <div className="App">
      <TodoList
        todos={todos}
        addTodo={addTodo}
        completeTodo={completeTodo}
        editTodoText={editTodoText}
        deleteTodo={deleteTodo}
      />
    </div>
  );
}
Next lets add some styling
* {
  box-sizing: border-box;
  outline: none;
  font-size: calc(1vw + 6px);
}

body {
  background-color: rgba(240, 128, 128, 0.6);
  margin: 0;
  padding: 0;
}

#root {
  color: rgba(45, 25, 45, 0.75);
  display: flex;
  flex-direction: column;
  justify-content: center;
  align-items: center;
  width: 100vw;
  margin: 0;
  padding: 0;
  min-height: 110vh;
}

#root > h1 {
  font-size: 5vw;
  text-align: center;
  text-decoration: none;
  color: white;
}

.App {
  font-family: sans-serif;
  text-align: center;
  background-color: white;
  width: 90vw;
  box-shadow: 0 4px 10px 0 rgba(0, 0, 0, 0.425);
  border-radius: 0.25rem;
  padding: 1rem;
  margin: 0 0 2rem;
}

.App > input {
  width: 40%;
}

.todolist {
  display: flex;
  flex-direction: column;
  justify-content: center;
  align-items: center;
  list-style: none;
  max-width: calc(90vw - 4rem);
}

.todolist > li {
  border: 0.1px solid black;
  box-shadow: 4px 4px 8px rgba(0, 0, 0, 0.7);
  width: 100%;
  text-align: center;
  display: flex;
  justify-content: space-around;
  align-items: center;
  padding: 0 1rem;
  margin: 0.15rem 0;
  background-color: lightcyan;
}

.todolist > li .left {
  flex-basis: 50%;
  display: flex;
  flex-direction: column;
  justify-content: center;
  align-items: center;
}

.todolist > li > .left input[type="text"] {
  width: 50%;
  height: 2rem;
}
.todolist > li input[type="text"] {
  margin-bottom: 1rem;
}

.todolist > li label {
  display: flex;
  justify-content: center;
  align-items: center;
}


h1 {
  text-decoration: underline;
  font-size: calc(1vw + 12px);
}

button {
  background-color: rgb(23, 5, 58);
  color: lightcyan;
}