
Section 1
CRUD App with Mongoose - Delete Edit and Update


Review Questions
- ❓ In your own words, describe the use case for Mongoose (what is it's purpose and when might you choose to use it?).
- ❓ A Mongoose _ is compiled into a Mongoose Model.
- ❓ We use a Mongoose _ to perform CRUD operations on a MongoDB Collection..
Describe REST and list the various routes
- REST stands for Representational state transfer
- It's just a set of principles that describe how networked resources are accessed and manipulated
- Even though Mongoose Has Many Different Method in a basic REST implementation we restrict the methods to the below table
| URL | HTTP Verb | Action | Used For | Mongoose Model Function |
|---|---|---|---|---|
| /things/ | GET | index | Displaying a list of all things | .find |
| /things/new | GET | new | Display HTML form for creating a new thing | N/A |
| /things | POST | create | Create a new thing | .create |
| /things/:id | GET | show | Display a specific thing | .findById |
| /things/:id/edit | GET | edit | Return an HTML form for editing a thing | .findById |
| /things/:id | PATCH/PUT | update | Update a specific thing | .findByIdAndUpdate |
| /things/:id | DELETE | destroy | Delete a specific thing | .findByIdAndDelete |
Beginning with the End in Mind:
Review Adding a Layout:
- Create a Layout Folder
- Make Default.jsx
- Use The Default.jsx on our pages
Deletion:
- Create a Delete Button for our new and improved Index.jsx page
- Create a DELETE Route
- Have the Delete Button send a DELETE request to the server
- Make the DELETE Route Delete the Model from MongoDB
Edit/Update:
- Create a link to the edit route
- Create an edit route
- Create an PUT route
- Have the edit page send a PUT request
- Make the PUT Route Update the Model in MongoDB
- Make the PUT Route Redirect Back to the Index Page
Deployment:
- Make a new github repository
- set up environmental variables
- Remove
node_modules - Get started with deployment services.
- Create app.
- Attach MongoDB Atlas
- Update code.
- Push git to deployment.
What is a Layout
Sometimes you will have design elements that you want to repeat from page to page, It can get very repetitive to repeat these items from page to page.
You may have the same header, the same footer, the same sidebar etc every page you navigate to.
React lets us use Components in our JSX the same way you use traditional html elements, but we get to determine the design and functionality of the Components.
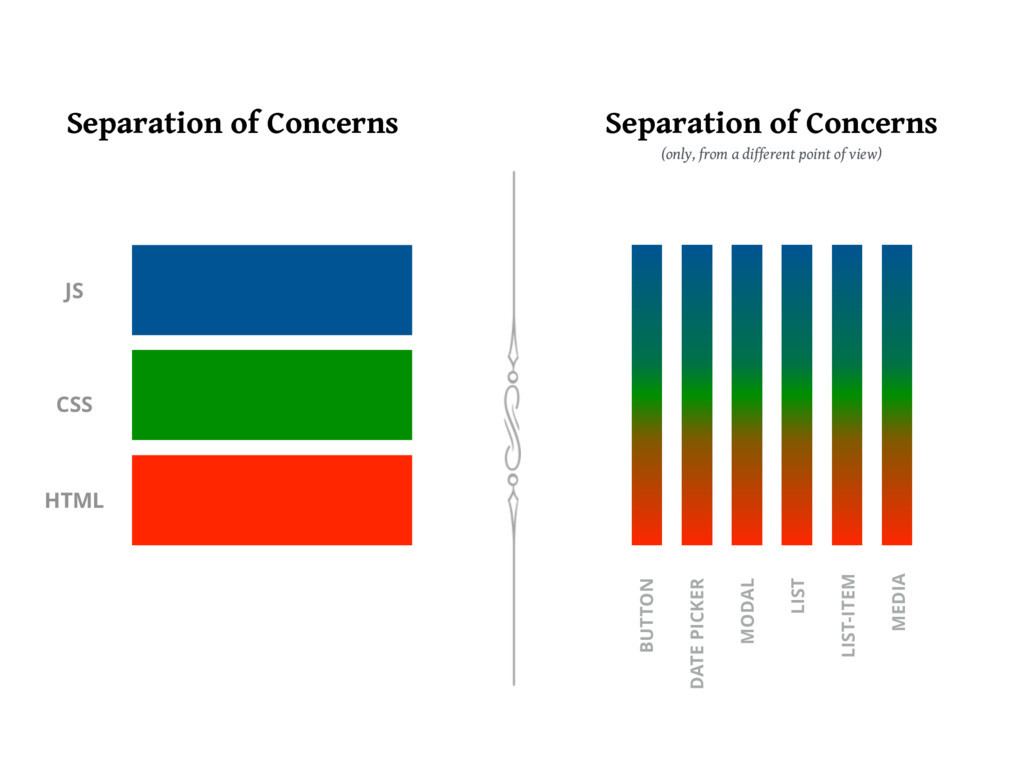
A different way of Seperating Concerns ( Component Driven Development )
What will we do?
- We will make a Layout Component that has our default header and footer code
- We will set up this Layout Component in such a way that it can be imported into our New, Show, Index and Edit Views
- We will make it a Higher Order Component which means it can accept other components as children simmilar to how divs work in HTML
<div>
  Children of the div go here
</div>
Our JSX will look like this
<Layout>
  Children of the Layout go here
</Layout>
We will also use PROPS
Props
Props allows a component to receive data from its parent component.
Some rules
- Props can only be sent from a parent to a child
- If the parent needs data from the child it should send a function as a prop then the child can pass its data to the function as an argument.
- Anything can be sent as a prop, include JSX
- Express React Views as you know takes the
optionsobject fromres.renderand merges that data with the components PROPS
Our JSX will look like this
<Layout someProp="information">
  Children of the Layout go here
</Layout>
Examples
<Layout css="/css/styles.css">
  Children of the Layout go here
</Layout>
or
<Layout title="Index Page">
  Children of the Layout go here
</Layout>
or
<Layout fruit={this.props.fruit}>
  Children of the Layout go here
</Layout>
These two examples are an example of how one of the Views might pass data down to Layout Component
In the example that we will create below we will discuss how to use the props
Add a Layout
Use the code from last class and lets continue to update fruits
From your terminal
cd viewsThen
mkdir layout && touch layout/Default.jsxThen
code layout/Default.jsxOpen Up your Default.jsx and type up the following code
Simply pass the relevant props to a layout component.
views/layouts/Default.jsx:
const React = require('react');

class DefaultLayout extends React.Component {
  render() {
    return (
      <html>
        <head><title>{this.props.title}</title></head>
        <body>
        <h1>{this.props.title}</h1>
        {this.props.children}
        </body>
      </html>
    );
  }
}

module.exports = DefaultLayout;views/Index.jsx:
const React = require('react');
const DefaultLayout = require('./layouts/default');

class Index extends React.Component {
  render(){
    const fruits = this.props.fruits;
    return (
      <DefaultLayout title={"Fruits Index Page"}>
        <nav>
          <a href="/fruits/new">Create a New Fruit</a>
        </nav>
        <ul>
          {
            fruits.map((fruit)=>{
              return (
                <li key={fruit._id}>
                  The <a href={`/fruits/${fruit._id}`}>{fruit.name}</a>
                  {' '}is {fruit.color} <br/>
                  {
                    fruit.readyToEat?
                    '  It is ready to eat':
                    '  It is NASTY!!!!!!'
                  }
                </li>
              )
            })
          }
        </ul>
      </DefaultLayout>
    )
  }
}

module.exports = Index;
Where does my data come from?
All "locals" are exposed to your view in this.props. These should work identically to other view engines with the exception of how they are exposed. Using this.props follows the pattern of passing data into a React component, which is why we do it that way. Remember, as with other engines, rendering is synchronous. If you have database access or other async operations, they should be done in your routes. For example our Mongoose Operations are Asynchronous
JSX Syntax Quirks
- className instead of class
- props (always come from Outside the component)
- {} to embed Javascript
- {{}} for inline styles
- Writing CSS in CamelCase
- Conditional rendering
- Everything Must Close
- Looping with map or map & filter
- Anything can be dynamic
Practice
Note: we will use this layout below in our New , Show and Edit Page so just hold tight. Make sure you save this file.
Create a Delete Button
In your Index.jsx file you will see the map function that we made previously we are going to swap out that map method with our updated map method. We will add a delete button next to each fruit. If this button is clicked we will delete the fruit
      {this.props.fruits.map((fruit,i) => {
                  return <li key={i}>
                      <a href={`/fruits/${fruit.id}`}>{fruit.name}</a>
                      is { fruit.readyToEat? <span>It is ready to eat</span>: <span> It is not ready to eat </span>}
                      {/* Your Delete Form Goes Here  It's incomplete we will fix below*/}
                      <form>
                          <input type="submit" value="DELETE"/>
                      </form>
                  </li>
              })}
Create a Delete Route : We will go into our server.js and create a delete route.
For right now we are not really deleting anything we are just going to send the word deleting to the browser.
app.delete('/fruits/:id', (req, res)=>{
    res.send('deleting...');
});
Have the Delete Button send a DELETE request to the server
When we click "DELETE" on our index page (index.jsx), the form needs to make a DELETE request to our DELETE route.
The problem is that forms can't make DELETE requests. Only POST and GET. We can fake this, though. First we need to install an npm package called method-override
npm i method-overrideNow, in our server.js file, add:
//include the method-override package place this where you instructor places it
const methodOverride = require('method-override');
//...
//after app has been defined
//use methodOverride.  We'll be adding a query parameter to our delete form named _method
app.use(methodOverride('_method'));
Now we need to go back and set up our delete form to send a DELETE request to the appropriate route, so we will be returning to our views/Index.jsx file and changing the opening form tag.
<form action={`/fruits/${fruit._id}?_method=DELETE`} method="POST">Make the Delete Route Delete the Fruit from MongoDB
Also, have it redirect back to the fruits index page when deletion is complete. This must be done in our server.js file in the delete route that we created a few thumbs up ago.
app.delete('/fruits/:id', (req, res)=>{
    Fruit.findByIdAndRemove(req.params.id, (err, data)=>{
        res.redirect('/fruits');//redirect back to fruits index
    });
});
Create a link to an edit route
In your Index.jsx file:
<a href={`/fruits/${fruit._id}/edit`}>Edit This Fruit</a>Create an edit route/page
First the lets create an edit route in our server.js file do this below the delete route we created earlier:
app.get('/fruits/:id/edit', (req, res)=>{
    Fruit.findById(req.params.id, (err, foundFruit)=>{ //find the fruit
      if(!err){
        res.render(
    		  'Edit',
    		{
    			fruit: foundFruit //pass in the found fruit so we can prefill the form
    		}
    	);
    } else {
      res.send({ msg: err.message })
    }
    });
});
Now the lets make the JSX file by using the command line to touch a Edit.jsx file in our views folder, then opening it in VS Code:
const React = require('react');
// As you can see we are using the app layout
const DefaultLayout = require('./layout/Default.jsx')

class Edit extends React.Component{
  render() {
    return (
      <DefaultLayout title="Edit Page">
     {/* See the Layout takes in a prop called Title and we pass Edit Page to it  note: comments can't go first or last in  jsx return*/}
          {/* form is not complete we will do that below*/}
      <form>
          Name: <input type="text" name="name" defaultValue={this.props.fruit.name}/><br/>
          Color: <input type="text" name="color"  defaultValue={this.props.fruit.color}/><br/>
          Is Ready To Eat:
              { this.props.fruit.readyToEat? <input type="checkbox" name="readyToEat" defaultChecked />: <input type="checkbox" name="readyToEat"/> }
          <br/>
          <input type="submit" value="Submit Changes"/>
      </form>
      </DefaultLayout>
    )
  }
}
module.exports= Edit;
Create an PUT route
Make the PUT Route Update the Fruit in MongoDB and redirect to that fruit's show page
app.put('/fruits/:id', (req, res)=>{
    if(req.body.readyToEat === 'on'){
        req.body.readyToEat = true;
    } else {
        req.body.readyToEat = false;
    }
    Fruit.findByIdAndUpdate(req.params.id, req.body, (err, updatedFruit)=>{
       console.log(updatedFruit)
        res.redirect(`/fruits/${req.params.id}`);
    });
});
Have the edit page send a PUT request
In the Edit.jsx find the opening form tag and add the code below you should only have one opening form tag after you finish this.
<form action={`/fruits/${this.props.fruit._id}?_method=PUT`} method="POST">Potential Bugs : Did you remove the other form tag if you copied and pasted? , did you miss adding method override?
Create a Seed Route
Sometimes you might need to add data to your database for testing purposes. You can do so like this:
app.get('/fruits/seed', (req, res)=>{
    Fruit.create([
        {
            name:'grapefruit',
            color:'pink',
            readyToEat:true
        },
        {
            name:'grape',
            color:'purple',
            readyToEat:false
        },
        {
            name:'avocado',
            color:'green',
            readyToEat:true
        }
    ], (err, data)=>{
        res.redirect('/fruits');
    })
});
Review Questions
- ❓ In your own words, describe the use case for methodOverride
- ❓ In your own words, describe the use case for a SEED Route
- ❓ In your own words, describe the use case for a Layout Component. Why is it DRY?
Bonus
We used Error First Callbacks in our examples... how might we use .then and .catch instead....